How many times have you taken your bike into the shop, and the mechanic drops his “chain checker tool” into the chain and says, “We will need to replace your chain and cassette” ?
Check, check, check your chain! It’s not uncommon to wear out a chain in 1,200 to 1,500 miles. A lot of riders can easily do that in a couple of months: you are probably one of them! It’s very common to forget about this vital component. The bicycle chain is the unsung hero for all your rides; when it’s bad your shifting is sloppy, and if worn out, can become dangerous. When it’s good, things are smooth and crisp. If your chain is worn to the point that it has worn out your cassette, it can slip under a heavy load and cause you to take a spill. This is the last thing we want, ever! A worn chain can also get stuck on a chainring or cassette cog, creating “chain suck,” which can damage your bicycle and possibly cause a crash. These two scenarios are real, and easily avoidable. Merely for safety, check your chain regularly. At least every few weeks if you ride consistently. The chain is the connection between what we put into the bike and what we get out of it. If there is no chain, your bike is essentially a fancy “balance bike,” so you better be good to it!
Chains generally wear from the inside out,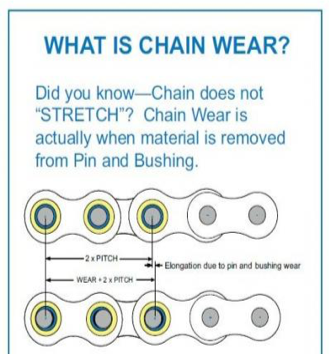 and in a couple of separate ways. The most common wear is in the pins and rollers located inside of your chain. These moving parts take all the grunt when you are climbing up a steep pitch, standing up for the sprint or spinning at 110 rpm’s. The parts continuously rub against one another creating grooves, which then allows the chain to stretch from the inside out. Therefore, a good chain lube is extremely important. It helps reduce the amount of friction between these two moving parts, thereby extending the life of your chain. If you have ridden with someone and you’ve heard a sound like birds chirping, it’s because their chain needs some lube. How annoying is it when you’re climbing a long hill and your buddy’s bike is making a high pitch chirp on every pedal stroke? I carry a small packet of lube for these folks in my seat bag (for my own sanity).
The other type of wear is from someone who mashes on the pedals in a high gear, “cross chains” a lot, and/or puts down some serious watts. This type of wear isn’t within the pins and rollers, instead it impacts the side-to-side rigidity of the chain. When this type of wear happens, it makes for terrible, inconsistent shifting on the cassette and chain rings. Think of a wet noodle versus a dry one and trying to move it between gears!
So, what can we do to avoid a big shop bill and keep safe? You can start by checking your chain wear. There are multiple methods and tools for doing this. The most common is a drop-in style “chain checker” from either Park Tool, Shimano, or Pedro’s. All three brands have great chain checkers; my favorite happens to Shimano’s TL-CN42 chain wear indicator. This tool pushes the worn roller against the worn pin using a three-prong design. It allows true measurement of the worn parts inside of the chain. Use a tool at home or bringing the bike down to your local bike shop for measurement every few weeks to a month to save money and save yourself from any injury.
Basic maintenance of your chain is easy, and anyone can do it in five minutes or less. Here are a few suggestions on chain lube and how to use it along with how to measure chain wear at home.
Start by grabbing the supplies:
- an old rag or two,
- some sort of degreaser (Finish Line Speed Degreaser is my favorite) and
- a good chain lube.
One note on the chain lube; if it’s summer and you are riding in dry conditions, use a “dry lube” that’s paraffin wax** based, like Rock N Roll Red. If you are riding in wetter months, use a “wet lube” like Rock N Roll Clear or Blue. But, if you are like most riders, just grab a bottle of the Rock N Roll Gold and call it a day: this will cover all the bases and keep things running smoothly.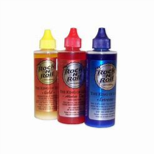
**The liquid in the paraffin wax lube is typically a cleaner and travel agent for the wax: make sure to give the bottle a good shake before applying to ensure maximum penetration. **
Please, please, please never use:
- motor oil,
- tri flow and
- do not ever under any circumstance use WD-40 aerosol as a lubricant!
If you are unsure what lube would suit you and your riding conditions best, give me a call or shoot me an email and I will be happy to help you.
How to lube your chain:
- Spray the degreaser on an old rag, then hold the wet portion of the rag somewhat loosely around the chain. Pedal the crank backwards, and this will remove any grit on the outside of the chain. You will never get it perfect unless you have a parts washer, so just focus on getting the old lube and grime off. Pro tip: Lay an old rag under the chain to collect the greasy droppings.
- Allow a few moments for your chain to dry.
- Spin the pedals backwards once again and apply the lube on top of the chain where it exits the bottom pulley, applying the lube to the middle of the chain. This will give the lube the maximum time to soak into the chain to coat the pins and rollers where we want it. Spin the pedals backwards three to four full rotations to make sure the lube has hit every link. If you want to be more precise, apply one coating to each side of the chain between the rollers and the outer plates.
- With a different rag (or a clean part of your first rag), pedal the crank backwards again, wiping off the excess lube. A few good turns of the pedals will be fine, or until you are satisfied.
- Let the lube “set up” for a couple moments.
- Go ride!
How to check your chain for wear:
- Grab your favorite drop-in chain checker tool.
- Apply a small amount of force to the pedal to bring the chain taut.
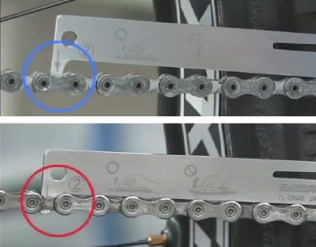
- Insert the back end of the chain checker tool into the top of the chain, and see if the front side with the gauge falls into the chain between the links. Do not force it in! If the tool falls in with no effort, it’s time to replace the chain.
- Insert the chain checker in between the bottom pulley and the chain ring. See if it drops in. (This allows you to measure two separate portions of the chain). If it falls in, it’s time to replace the chain.
**Follow manufacturer instructions for chain checkers with multiple numbers and double-sided gauges. This will help you determine whether you should replace your cassette as well. As a rule of thumb, if you stay up-to-date on replacing your chain in a timely manner, you can get two chains before replacing your cassette. If you are not sure if your cassette is worn, there is a cassette wear measuring tool. If you’re curious, come in and I will measure it for you. **
We will go over how to replace chains and cassettes very soon, if you have any questions you can always reach me via email, in-store or by phone.
-Devin Bovee
Devin@stevensbicycles.com
559.797.0148